During the Dots on Dots Blog Hop, I promised to put together a tutorial to show you how I fussy cut fabrics for paper-piecing.
When I first began paper-piecing I struggled with centering a motif in a particular section because of the way seam allowances are trimmed before pieces are sewn together. Without a lot of shifting, which often left another area uncovered, I just couldn't place my fabrics exactly where I wanted them. My results were often haphazard. However, once I learned this trick, I can now put any motif exactly where I want it on any paper-pieced design!
So on my Design Wall today is this little teapot block. I’ll show you how I planned my fabric placement so that the flowers are centered perfectly in their section of the block.
 |
| Find this cute Teapot pattern here - http://www.craftsy.com/pattern/quilting/other/tea-pot-paper-pieced-block/17870 |
Please note that this tutorial will assume that you already know how to paper piece. If you are new to paper-piecing, there are many tutorials available on the web to help you learn.
In addition to my normal paper piecing supplies, fabrics and pattern, I also used a light box.
Section 5 is the area that I want to fussy cut.
First I turned the paper pattern over. On the back I marked the line between Sections 1 and 5 where I would be sewing, as well as the left & right side lines, with a pencil so I could see it clearly - see picture below....
Then I laid my pattern piece right side up on the light box and positioned the fabric, also right side up, on top of the pattern, placing it the way I want it to look in the finished block. Can you see how the lines of the pattern show through the fabric so I can audition placement of the motif I am fussy cutting?
Place a small amount of fabric glue on the paper and stick the fabric to it in the desired placement position. My fabric glue stick goes on blue and disappears as it dries.
This is only a temporary process to hold the fabric in place while you prepare it. You will unstick it soon, so do not use a lot of glue, just enough to hold it in place without shifting.
Using a pair of scissors, I trimmed the fabric generously around the lines of the section - DO NOT TRIM THE PAPER, JUST THE FABRIC. Since the fabric is glued down it will not shift while you do this. Also note that this is not the time to get frugal with fabric! Make sure you have plenty of fabric around the edges of the section.
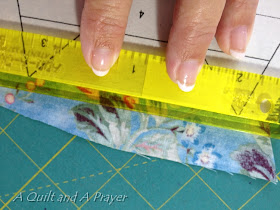
Next I placed everything on my cutting board, fabric side down, and using my straight edge, folded the paper back on the sewing line. Then I used my 1/4" ruler & rotary cutter to trim the 1/4" seam allowance for the fabric. This is where you veer away from normal paper piece technique for a minute. The fabric is still wrong side to the right side of the pattern. But do not be concerned; it will go back to the normal positioning of right sides together before you sew :*)
My fabric now has only the 1/4" seam allowance remaining over the line where I will be sewing:
Next I lifted the fabric up and made small pencil marks on the back of it at each line, left & right of the sewing line, so I would know where to position it when I turn it right sides together to sew. This is the mark I had on each side on the back of my fabric.
Now I was able to gently unstick the fabric from the pattern.
I then paper pieced sections 1-4 as I normally would, trimming my 1/4" allowance on Section 1 to which I would sew my fussy-cut Section 5.
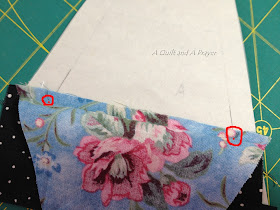
As I placed my Section 5 fabric right sides together in position to sew it to Section 1, I already knew my motif would be in perfect position top to bottom because I had cut my 1/4" seam allowance while it was glued perfectly in place on the pattern. Now my pencil marks on the back of the fabric will line up with the lines on the pattern, so I can be sure that the motif is centered right to left as well.
See how the lines meet in the picture below at the red dots? When I was satisfied that I had the fabric correctly centered left to right, I sewed on my line as I normally would.
Now see how neatly the motif fits in the desired section! I have already added the top Section #6 in this picture so you can get the full picture of how nicely the motif is centered.
And here is my finished result!
A perfectly fussy cut flower motif!!!
I hope this tutorial helped you! If you have questions, please feel free to email me and I'll do my best to answer them.
Please go to Patchwork Times to see what others have on their Design Walls today =^..^=
I also wanted to give you a nice head's up that Barbara over at Cat Patches is having a wonderful giveaway to celebrate 700 followers! Go HERE to see the goodies you could win :*)
Hugs & Blessings!
Teresa
=^..^=


Thank you for sharing this tutorial, very helpful.
ReplyDeleteI love paper-piecing and I love your paper-pieced teapot. Thanks for the tutorial. I will definitely have to try it out.
ReplyDeleteThat little teapot quilt is just the cutest thing!
ReplyDeletePaper piecing and I haven't been on speaking terms for years, but your instructions are very clear--in case we ever make up. : )
Gret information. Very helpful. Do you make your own paper piece patterns? I would love a tutorial on the "science behind making a pattern. D you know of any resources on the topic?
ReplyDeleteSuper cute block, the gussy cutting is the perfect addition.
ReplyDeleteNice tutorial. Cute teapot, too!
ReplyDeleteThank you for your tutorial... I can see some cute teapots in my future!
ReplyDeleteLove the teapot!! What a great tutorial. You go girl---
ReplyDeleteThat's just the cutest little tea pot ever! Lovely tutorial.
ReplyDeleteHave a great day.
Always, Queenie
Thanks for sharing such a great tutorial Teresa!
ReplyDeleteYou make it looks so effortless and easy! Great job!! When I get home, I'm going to make some Christmas teapots with the pattern. I may e-mail you for assistance!! :)
ReplyDeletegreat tutorial!! What a sweet little teapot :)
ReplyDeleteYou make this seem so easy. I love your little teapot block. It's so cute. Your tutorial was very well written and photographed. Thanks so much for sharing. It will come in handy if I need to fussy cut on any paper pieced project in the future.
ReplyDeleteThanks for the tute! I've got to make that tea pot. It is great.
ReplyDeleteLove your little Teapot!
ReplyDeleteLove the tutorial! I will have to try the technique soon. Thanks. :)
ReplyDeleteGreat tutorial! There's always something to learn when it comes to paper piecing. Nice of you to share this!
ReplyDeleteThanks for a great tutorial! I think this will be really useful in the my paper piecing! Good pictures in your tutorial.
ReplyDeletesusie
www.susiessunroom.blogspot.com
Very pretty, Teresa, and a great tutorial!! Whoop whoop!!
ReplyDelete