Pages

Showing posts sorted by date for query easy street. Sort by relevance Show all posts

Friday, January 6, 2017

January Goals

Baby, It's COLD outside!!!!


Some of you will remember my little Bertie's Year January wall quilt which I did several years ago.  I made all 12 of them and change them out each month.  Thank you Bonnie Sullivan for such wonderful designs :*)  Poor little Bertie will go to any lengths to make friends, even with a snowman in the depths of winter!  Unlike Bertie, I am staying inside!  My grandson asked if I made a snowman out of the snowfall we got this morning, and I told him I never even stuck the tip of my nose out the door.  He laughed at that :*)

In these frigid temps, I think it is in our DNA to be thoughtful about survival and eating well to stay healthy.  One of my goals for 2017 is to learn to cook more healthy meals.  (Well, basically, to learn how to cook period LOL!!!). We are both at the age where many foods bother us for one reason or another.  My Guy especially suffers reactions to MSG, and there are few packaged or processed food items that don't contain it.  We've found it in foods we would never have suspected!  Most gravies of course, and anything with flavorings, extracts, enzymes, etc.  Even crackers, bread and last week a bag of shredded Parmesan cheese!  For New Year's Day, I challenged myself to try one of the recipes I've been collecting - Double Crust Chicken Pot Pie....


It was absolutely DELICIOUS!!!

Now that's what I call "comfort food"!!!!  And it didn't take a village to put it together either.  I diced some celery and onions, as well as the turkey, and then all I had to do was gather the other ingredients and have them ready to add when needed.  One of my favorite things about this dish is that it cooks in my cast iron skillet!

I used the leftover turkey I had frozen from Thanksgiving.  Although it was really, really good, the dark parts of the turkey kept it from being a perfect meal.  Next time I will use fresh chicken breasts instead.  We loved it and will definitely be making it again!  You can get the recipe HERE if you are interested in trying it out yourself :*)

This first week brought my first finish of 2017!


This is a Kismet Trinket Box, a Sara Lawson (Sew Sweetness) design, and although it was not an easy sew, it wasn't too terribly difficult either.  Anyone with at least intermediate bag sewing skills should be able to make one.  There are six sizes/shapes in the pattern - this one is the Large Square box.


I made this as a birthday gift for my friend Susie who is a real-live artist, so I had to chose fabric worthy of her, right?  Jane Sassaman fabrics can always be counted on to give that extra "wow" factor!  These are two that I picked up when Jane came to our guild last September.  I have to say, there are few things that make me happier than working with beautiful fabrics like these!!!  You can be sure that I plan to follow this one up with one of my own!  Here is a quick peek at the back as well ....


Today I cut all the pieces for Block #6 of the I Believe Sampler UFO project and they are ready to be pieced as soon as I hit the "Send" button here!  First I had to repair my "oops" from yesterday on Block #5 - I'm sure you'll all be relieved to know that the bottom left unit is now correctly oriented :*)


Getting this top pieced together and ready for quilting will be my One Monthly Goal project for January.  You can see lots of other UFO's in various stages of construction HERE at the amazing Elm Street Quilts!


And Bonnie Hunter revealed her En Provence mystery quilt on January 1!!!!!!

©Bonnie Hunter - En Provence

I'm looking forward to getting back to this project!  I was caught up through Clue #5....


But then it had to sit for the past week.  I've begun cutting the pieces for #6, and hope to have them sewn by the end of the weekend.  If I'm really diligent I should have Clue #7 cut and started as well.

I've only made half the number of units called for in Bonnie's clues - mainly because I wanted to be sure I liked the quilt enough to work that hard on it - Bonnie never designs easy quilts!  Now that I know I like the design enough to finish making the quilt, I have to make a decision about the size I want it to be.  I really don't need more large quilts, so I'll stick with my original intention of just making a large throw.  I'm only going to have enough units to make 8 blocks, so my plan is to make one more block and lay them out 3x3 for a 70"-ish square throw.  I think that'll work!!!

Rocky is pretty much worn to a frazzle with all the extra workload lately.  He's demanding extra naps and treats. With good help so hard to find, I'm pretty much caving in to his demands.  I just hope he doesn't ask for a raise because he already gets top dollar!


My guild UFO number was #11, which is for me to quilt my Soul Searching top.


I finished the top in September 2014 at Runaway Quilters Retreat.  I suppose it's about time to get 'er done!!!

PS - for some reason my email account stopped allowing me to send out replies to your comments yesterday!  I apologize for not letting you know in person how much I love hearing from you, and I promise to have My Guy working on it first thing tomorrow!!!

Hugs & Blessings!
Teresa
=^..^=

Monday, June 15, 2015

Cozy Afternoon!

It's Here!!!


The Cozy Afternoon BOM starts today!  If you've signed up to sew along, you should have already received an email from Jacquelynne with the patterns for the first two blocks.  If you haven't signed up .... what are you waiting for?????  It's FREE!!! And it's FUN!!!  Go HERE NOW to sign up :*)

You can see Jacquelynne's wonderful blocks #1 and #2 on her blog post today HERE, and see how gorgeous they look in her fabric choices.  (She does still have a few fabric kits, but they're going fast so get one while you can!!!)  Her post shows many different ways to make the fun and easy blocks - applique, embroidered, or even just pieced with a yummy focus fabric!

All of Jacquelynne's guest bloggers are also posting the first two blocks today - including me! :*)  You can find all those super friendly, helpful guest bloggers listed below!  And as always, stick around to the end of this post, because Jacquelynne is offering a SUPER GIVEAWAY PACKAGE!!!

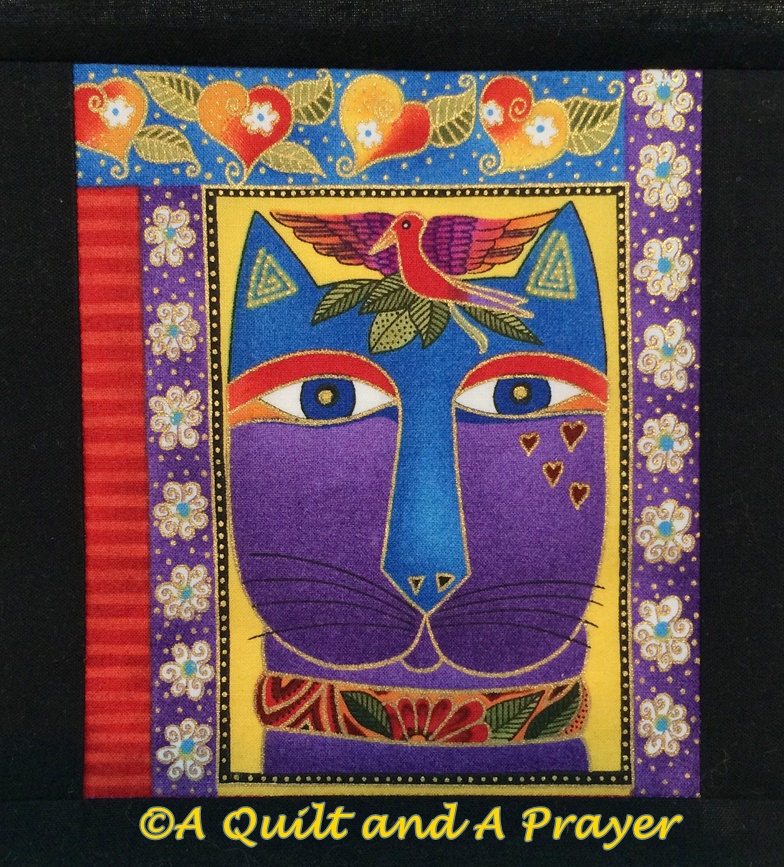
As I shared in an earlier post, my plan is to continue using the Laurel Burch panel cats that I used in Sew Sweet Simplicity last year...

Yes, I had to change the corners of the top block so it would "chain" with the others :*)

And by the way, if you missed out on the Sew Sweet Simplicity sew-along, don't fret!  You can still get the patterns at a very small cost from Jacquelynne's Shop HERE!

When I realized that the blocks for Cozy Afternoon (CA) are all rounded in design, I thought they would be perfect to set in between the SSS blocks - and I was right as you will see :*)

The first CA block is a super simple strip design.  Here are all my pieces cut and ready to go ....


It was a snap to simply sew those four hot-colored strips together in the order I liked best and then cut them into the required sized chunks for the block design ....


These bright fabrics make a very colorful frame for this gorgeous Laurel Burch Cat, don't they?  


There will be TONS of color and activity going on in this quilt, so I've decided to use this calming purple dot with black to make corner HST's on all of these CA blocks to pull it together.  I'll share more on my thoughts on that later :*)


I used Jacquelynne's instructions for making these hst's and then squared them up using my favorite new tool, the 6-1/2" Bloc-Loc ruler.  I'll explain more about these rulers in a little more depth later in this post :)

Here is my completed Block #1 .....


I just LOVE IT!!!

So now on to Block #2!

Lots of bright colorful hst's for this block!  First we make four hst diamond blocks - these were so fun!!!


You might notice that instead of pressing these seams open as Jacquelynne suggests, I decided to press mine to one side because I may end up quilting this block by stitching in the ditch (SID) and will need that fabric under the stitching if I do.  If you don't think you'll be using SID for your quilting, then pressing the seams open is definitely the way to go!  You can see in the top right photo that I also alternated the pressing direction on these so they would "nest" nicely for me when it came time to assemble the units....


I also used a Bloc-Loc ruler on these smaller units -  my 2-1/2" ruler was perfect for the job!


In the top two pictures, you can see that you simply line up the diagonal seam with the "groove" in the ruler and trim the first two sides, leaving room to turn and trim the remaining two sides to finish it up to a perfect square.  See how nicely that diagonal is kept true?  That makes for perfect hst's, and no tips floating or cut off when you stitch them together - pure bliss!!!

These rulers are a little pricey, but I have found them to be well worth it.  They are available in many sizes, but I actually use the 6-1/2" ruler for most applications because it will square up any size hst that size or smaller.  I couldn't resist picking up the 2-1/2" ruler at Quiltfest this year because I knew it would be a pretty common, much-used size - and I must admit, it is a luxury to have that convenience :*)  HERE is the Bloc-Loc site if you are interested in checking them out.

Once all the little hst diamonds were finished up and looking oh-so-adorable, Jacquelynne has us twist them around one clockwise turn around the block for additional interest - notice how each fabric travels around to a different position on each diamond?  I really like this fun effect!


Sooooo back to the star of this block - the Laurel Burch Cat!  I chose to use this wonderful feline for the center of Block #2 .... it takes me back to my groovy 70's days :*)  Flower Power baby!!!


And here is my completed block ....


Again, I love it!!!
Isn't this a FUN block?  

And here is my Design Wall with the two new blocks added ...
The circle shows where I fixed the corners of that center top block so it "chains"
Notice that I've chosen to use the hot colors (pinks, reds, yellows, oranges) in the side sections of the new CA blocks, and then contrasted with the cool purple dot/black hst's in the corners?  That's to give the design a framework, so the eye can rest on those cool areas :*)  The center block will be surrounded with the purple dot to tie it all together.

I hope my blocks will offer some inspiration as you start to play with your Cozy Afternoon version!  Be sure to share your blocks with us on Instagram at #CozyAfternoonQuilt - spread the inspiration!!! 

Block #3 will be released July 13, so be sure to come on back !!!


And now, for the GIVEAWAY you've all been waiting for!!!  This awesome Digital Pattern Package from Jacquelynne is going to the winner of my giveaway!!!  For your chance to win, leave me a comment telling me what you like to do best on a "cozy afternoon" - and keep it clean LOL!!!  If you are a follower, you can have a second chance to win by leaving a second comment letting me know how you follow!!!  The giveaway is open to all readers, domestic and international, and will end at midnight on Saturday, June 20.

Now - head on over to visit the other Cozy Afternoon guest bloggers - you'll be glad you did!!!  See their creative versions of the CA blocks, and get more chances to win the super GIVEAWAY!!!

A Quilt and a Prayer (ME!!!)


Lily Pad Quilting   


Red Letter Quilts


The Crafty Quilter


44th Street Fabric

http://44thstreetfabric.blogspot.com/                       


Kathy's Quilts


Hugs & Blessings!
Teresa
=^..^=

Also linking up with Patchwork Times Design Wall Monday and Freemotion by the River Tuesday Linky Party

Friday, August 22, 2014

On the Needles - 8/22/14

First off, allow me to show off my finished Happy Dance Socks!!!

My husband has a problem with the fact that the color bands don't match -
but I actually think I love them more because of it!
And don't even get him started on those little stray dots of color!!!!
They are comfortable ....


They fit perfectly .... 


And these colors just make me HAPPY!!!
I LOVE THESE SOCKS!!!!

Okay, I'll stop screaming at you now LOL!!!  Unless, you didn't quite get my message that I really, really love these socks?  Oh, you got it?  Great!  Then moving on..... *very big grin!*

Next up on my needles for a quick, easy, portable project is actually not a pair of socks.  I know, you're wondering if the world is getting ready to come to an end, right?  No ... well, I suppose it could be, considering everything that is going on in the news right now!  But just sayin' it won't happen because I put something else on my needles LOL!!!

As you know, I am working on my Rocio sweater, but that project takes complete concentration -  not very portable.  And because of that, it has received absolutely NO LOVE this week!  However, a knitting friend of mine let me know that the Haus of Yarn Bus would be in my town last Saturday - and I had to go check it out!!!  (And I got in a lot of trouble for going without Joanne who was at the beach!)


This bus arrives in the parking lot of a business on Main Street - about 5 minutes max from me - every first Saturday of the month.  Yep, real temptation here folks .... now the yarn is coming to me!!!


Haus of Yarn is located all the way on the other side of Nashville so I've never visited there before.  

Photo credit of Haus of Yarn website
But let me tell you, if the bus is any indication, this is one brick-and-mortar shop I need to go visit for real!


Well, not too soon, mind you, because I dropped a pretty penny just visiting the Bus!!!  Look at all these pretties!  So many samples, of just about any project you might want to play with!  And samples are my downfall because once I see with my eyes what my needles can make - not just that hank of yarn, right? - then I am doomed  .... Doomed, I tell you!!!!

I managed to restrain myself somewhat, but I did come home with TWO skeins of yarn for socks.... and the very sweet & friendly Meg offered to wind them into balls for me too!  I went with a specific idea to get some aqua for socks and found it!

Left is Smooshy in Raspberry, and the right is Frolicking Feet in Aquas
YUM!!!!
 I even splurged on a new pair of Addi needles for the cuffs since I didn't have a long-cord #3 (remember my short cord in the last post HERE?)  Well, these are called "Rocket" Turbo needles and are especially designed for socks and lacework .... and just look at the long, sharp points on these little boogers!!!!


Yes, my friends, these needles slice through a row of stitches like butter .... or something like that ... you know what I mean, right?

My only other purchase was a set of 5 different yarns in a kit that I just couldn't resist!

Aren't these just DELISH????
They have a very slight sheen to them, and so soft!!!
These are small, 1 oz skeins, and I wish I had taken a picture of all the different color options that were available!  I almost came home with a group of bright rainbow colors, but then I decided on these colors for Fall instead.  Meg was making a Diagonal Cowl out of these very colors (yep, I saw it and was doomed!) from her own simple pattern, which she very generously shared with me and a couple of the others who were interested.  It will make just a simple, continuous cowl.... doing a stockinette stitch with increases and decreases at the beginning and end, and working in each color until it is gone.  Here is my start....


Meg cast on 79 stitches, but I only cast on 65 because of my short stature.  I think this will be a very pretty accessory this Fall :)  For now, it will be my portable take-along project instead of a pair of socks.  I'm sure I will be refreshed and excited about starting a new pair of socks when this is done.

This means of course that I now have to add these yarn totals to my Knit the Stash report on the right side of the blog over there....  1,230 yards in and 400 yards used.  So my 2014 totals are now:

Yards stashed:  3,430
Yards used:  1,500
Net Yards stashed:  1,930

So what's On Your Needles???  
Share with us at Judy's Patchwork Times today!
Judy has a beautiful sweater finish she's sharing with us today :)

Hugs & Blessings!
Teresa
=^..^=


Thursday, June 5, 2014

Sizzix Fabric Cutter Review

Thanks to all of you who commented on the new Sizzix cutting area My Guy put in my sewing studio!  

Having a dedicated area for cutting is amazing!!!  I've never had that kind of room for sewing before, and believe me I am so grateful for it now!  I suppose there is something to be said for the Empty Nest, right?


The question most of you asked was for my opinion on the difference between the Sizzix and the Accuquilt machines.  So I thought I would share on a post for all of you :)

I really haven't used an Accuquilt Go cutter, but I have friends who own one and they are very happy with it.  I have to tell you though that I LOVE my Sizzix Big Shot Pro!  I purchased it because I got an amazing deal on it, and it does everything I would want a cutter to do.  The only cutter that can hold a candle to it is the Accuquilt Studio, but the cost of Studio dies takes my breath away!!!  I can cut very small pieces from a 6" die or up to 5 strips at a time if I'm using the extended tray and large dies - such a time saver!  And they are perfect every time.  I waste very little fabric because I cut my fabric to a size just a bit larger than the piece I am cutting before I put it in the cutter.  Some waste, yes, but I find that my pieces are more accurate so no waste from mistaken cuts or time spent thinking about where I need to cut each time.  It's definitely worth it for me!  What I may waste in fabric I more than make up for in time and the lack of stress.  And don't forget the lack of stress on my hands from rotary cutting!

I can also use any die with my machine, both Sizzix and Accuquilt dies.  However, the Accuquilt Go can only use Accuquilt dies, not Sizzix.  I felt it gave me more options.  I think Accuquilt has more die options, but since I can use any of them in my Sizzix with an adaptor, that's not a problem.

I cut Easy Street almost exclusively with dies..... see my posts HERE and HERE ...


..... most of Bonnie Hunter's quilts can be cut using a die cutter!

At our last Guild meeting, Scrap Queen Pam, shared that she purchased a Go Baby for the smaller dies and loves that it is transportable.  I have to say, I was intrigued and will store that in my little brain for the next time Joann's has a sale :*)


So those are my thoughts - I would love to hear any of your thoughts or experiences too.

Hugs & Blessings!
Teresa
=^..^=


Tuesday, August 20, 2013

A Fun New Project!!!

I went to a really fun and different workshop at my Music City Quilt Guild's Sit-n-Sew day last week.  One of my favorite people, Starr Howell, taught us how to make selvedge boxes.  Just to prove that I was an A+ student, here is my finished box.....  cool, huh???


One of my favorite quotes from Bonnie Hunter is - the smallest leftover strip of fabric costs the same amount as any other piece of fabric you buy - why throw it away?  I've been throwing away selvedges since I started quilting; that is, until I saw Starr's first box at a meeting a couple of years ago, and I've been wanting to make one ever since!!!  The class was on Thursday and I was looking forward to it excitedly, but on Wednesday night I got NO SLEEP AT ALL!!!  I kept hearing that 5th Dimension song from waaaaaaaaaaaaaaaay back all night - you know the one..... "Last night, I didn't get to sleep at all, all, all..... I lay awake and watched until the mornin' light..."  Yeh, that was me!  When hubby got up at 5:30am, I was in the studio cutting squares for Talking Turkey!

But even though I was afraid would pretty much be a zombie, I was determined to take this class!  All my stuff was loaded and ready to go, so I "suited up and showed up" LOL!!!  Actually, the zombie state did not hit me until Friday - go figure!  But I was really glad I went to class, because we had fun and I've got a really cool new box to keep my selvedges in now! ♥♥♥

The first thing we did was cut pieces to fit the top and all four sides of the box, allowing an extra 1-1/4 inches for trimming.  Then we had a BLAST digging through our selvedges and picking out our prettiest ones, then pinning them down.  Once a couple of pieces were all pinned, we chain-pieced the selvedges down, trying to sew as closely as possible to the edge (sorry this one is a little blurry!)......


Here are my finished pieces (before trimming down to the correct size)....


Starr had told us ahead of time that the trick to pretty selvedge projects is to cut at least 3/4" of the fabric off with the selvedge so you get some color with it.  She sure knows what she's talking about - look at all that wonderful color!  And look at my completed box top shown below ...yoohoo!!!!


Now I ask you, does that look like me or what?  
All that color - oooo-la-la!!!

And look at some of the special selvedge designs... can you see where the designer used birds instead of color circles on the upper left here?


And Christmas Trees here?.....too cute!!!!


And the cutest little set of Japanese fans in the bottom corner.... awwww......


There are selvedges in here that remind me of the projects I've made.... like Easy Street - this fabric was used as the border....


And Genevieve's Live-Laugh-Love - this one isn't even finished yet, but it's now immortalized for me in my selvedge box!


A lot of these are from friends who knew I was collecting them, which makes them special too!!!

As I was gathering my materials together from Starr's class list, I wasn't sure what to bring for the bottom and trimming on the box.  I finally just grabbed a bland pink/red buttons print figuring a sewing motif would work no matter how the box turned out.  Boy, was I wrong!!!  That pink looked horrible with it!  All these wonderful colors in this box, and I just couldn't put that washed out pink on there... no way.  A bright, happy pink might have worked, but.....

Then Sheila came to my rescue!  I had spied her trimming fabric earlier and drooled all over it - she had chosen a bright purple and it glowed!!!  When it was determined by a large group of us that purple was what my box needed, Sheila generously offered me her left-over purple so I could make my box beautiful - now that's a sweetheart folks!!!

Looking at the finished box again - isn't that purple just perfect???  
                     Yep, I thought so too :*)
                                    Thanks so much, Sheila!!!!


And here is my finished box with all my selvedges (so far!) in it.  They were all neatly folded before I began the project, and I'll sit with this in my lap tonight while I watch TV and straighten them all up again.  It's so much easier to see what's there when they are not all jumbled up like that!

Love this "Good Morning!" piece =^..^=
(I just cut it last night, or it would have gone right on top of my box!)
........ all ready for a new selvedge project.  Let's see.... what will it be????  There are a ton of cute projects out there right now!  And tons of new selvedges, like "Good Morning!" just waiting to shine....

I cut this one Friday while playing with Talkin' Turkey!
(Another candidate for the top of the box, am I right????)

That sweet measuring tape selvedge was cut from this fabric :*D

And how about this one - too sweet!!!!!
I bet you are designing something just as beautiful!

Hugs & Blessings!
Teresa
=^..^=

Related Posts Plugin for WordPress, Blogger...