Pages

Showing posts with label Dots on Dots; A Spot of Tea. Show all posts

Monday, October 8, 2012

DWM: A Tutorial–Fussy Cut Paper-piecing

During the Dots on Dots Blog Hop, I promised to put together a tutorial to show you how I fussy cut fabrics for paper-piecing.  

When I first began paper-piecing I struggled with centering a motif in a particular section because of the way seam allowances are trimmed before pieces are sewn together.  Without a lot of shifting, which often left another area uncovered, I just couldn't place my fabrics exactly where I wanted them.  My results were often haphazard.  However, once I learned this trick, I can now put any motif exactly where I want it on any paper-pieced design!

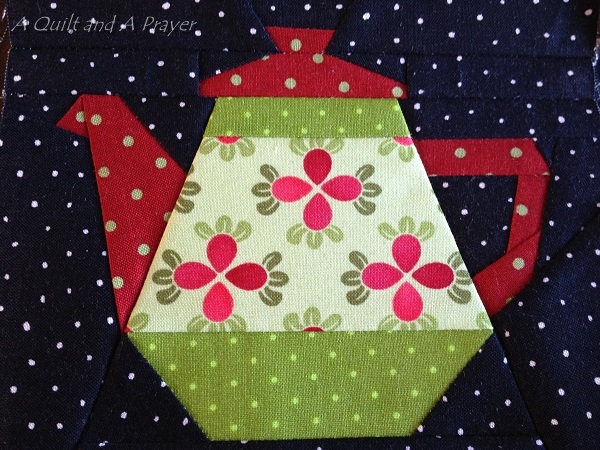
So on my Design Wall today is this little teapot block.  I’ll show you how I planned my fabric placement so that the flowers are centered perfectly in their section of the block.

Find this cute Teapot pattern here -
http://www.craftsy.com/pattern/quilting/other/tea-pot-paper-pieced-block/17870
Please note that this tutorial will assume that you already know how to paper piece.  If you are new to paper-piecing, there are many tutorials available on the web to help you learn.

In addition to my normal paper piecing supplies, fabrics and pattern, I also used a light box.


Section 5 is the area that I want to fussy cut.

First I turned the paper pattern over.  On the back I marked the line between Sections 1 and 5 where I would be sewing, as well as the left & right side lines, with a pencil so I could see it clearly - see picture below....  


Then I laid my pattern piece right side up on the light box and positioned the fabric, also right side up, on top of the pattern, placing it the way I want it to look in the finished block.  Can you see how the lines of the pattern show through the fabric so I can audition placement of the motif I am fussy cutting?


Place a small amount of fabric glue on the paper and stick the fabric to it in the desired placement position.  My fabric glue stick goes on blue and disappears as it dries.  


This is only a temporary process to hold the fabric in place while you prepare it.  You will unstick it soon, so do not use a lot of glue, just enough to hold it in place without shifting.

Using a pair of scissors, I trimmed the fabric generously around the lines of the section - DO NOT TRIM THE PAPER, JUST THE FABRIC.  Since the fabric is glued down it will not shift while you do this.  Also note that this is not the time to get frugal with fabric!  Make sure you have plenty of fabric around the edges of the section.


Next I placed everything on my cutting board, fabric side down, and using my straight edge, folded the paper back on the sewing line.  Then I used my 1/4" ruler & rotary cutter to trim the 1/4" seam allowance for the fabric.  This is where you veer away from normal paper piece technique for a minute.  The fabric is still wrong side to the right side of the pattern.  But do not be concerned; it will go back to the normal positioning of right sides together before you sew :*)


My fabric now has only the 1/4" seam allowance remaining over the line where I will be sewing:


Next I lifted the fabric up and made small pencil marks on the back of it at each line, left & right of the sewing line, so I would know where to position it when I turn it right sides together to sew.  This is the mark I had on each side on the back of my fabric.  


Now I was able to gently unstick the fabric from the pattern.
I then paper pieced sections 1-4 as I normally would,  trimming my 1/4" allowance on Section 1 to which I would sew my fussy-cut Section 5.  

As I placed my Section 5 fabric right sides together in position to sew it to Section 1, I already knew my motif would be in perfect position top to bottom because I had cut my 1/4" seam allowance while it was glued perfectly in place on the pattern.  Now my pencil marks on the back of the fabric will line up with the lines on the pattern, so I can be sure that the motif is centered right to left as well.


See how the lines meet in the picture below at the red dots?  When I was satisfied that I had the fabric correctly centered left to right, I sewed on my line as I normally would.


Now see how neatly the motif fits in the desired section!  I have already added the top Section #6 in this picture so you can get the full picture of how nicely the motif is centered.


And here is my finished result!


A perfectly fussy cut flower motif!!!

I hope this tutorial helped you!  If you have questions, please feel free to email me and I'll do my best to answer them.  

Please go to Patchwork Times to see what others have on their Design Walls today =^..^=

I also wanted to give you a nice head's up that Barbara over at Cat Patches is having a wonderful giveaway to celebrate 700 followers!  Go HERE to see the goodies you could win :*)

Hugs & Blessings!
Teresa
=^..^=


Monday, October 1, 2012

NewFO’s and UFO’s and DWM – Oh My!!!

Wow!  I can’t believe September is gone already, can you? 

That means it's time for a little recap and report on my progress for the month.  And since it also happens to be Monday, let me start with what is on my Design Wall today….


This is the expanded block from The Blue Collection that I showed you yesterday.  I'm happy to say it is now completely finished with the exception of a few stems and leaves that I cannot add until the blocks are joined together.  It was already mostly complete, I only had to add some leaves and stems and the upper lip around the bowl …


These little stems & leaves may not look like much work, but let me tell you, I'd rather do ten of those oranges than just one little stem!  They are such tricky little boogers to turn under and get them just right!!!!  These two stems and leaves took me forever to complete!

….and then, because it was a heavy sports day, giving me lots of time for handwork, I finished up another one!


This one I completed from start to finish.
(And yes, I know it needs to be pressed LOL!)


The top went together like a charm - I love the fussy cut lid :*)

I think my needleturn applique is definitely improving!!!   =^..^=
I also prepared the next block for this quilt so I can be ready to work on it next Sunday :*)

It’s been quite a while since I have had a completed UFO to report for Judy’s UFO Challenge, so I was delighted to finish up Girls Just Want to Have Fun while at Runaway Retreat a few weeks ago!  I'll definitely be asking, Can I Get a Whoop! Whoop! on Friday!!!

I've got to get a better photo of this quilt!
This quilt required a lot of cutting and sewing up of a lot of little pieces, but it is well worth the effort, don’t you think?  And as I've said before, it is probably the only 30’s quilt I will ever make, so it will definitely be special to me :*)  I think my guests will truly feel pampered with it on the bed when they come to visit.  Now if I can just get it quilted. =^..^=

For Barbara’s NewFO Challenge, I had quite a few ideas and projects that were calling for my attention, as I reported HERE.  But I finally narrowed it down to these fun new starts…..


Most of you will remember that I participated in the Dots on Dots Blog Hop and made this cute little teapots table quilt which I named A Spot of Tea.  I received the Honorable Mention award that day – yes, I know, I’m special – hahaha!  :*D

I also jumped on the Hawaii Sunset bandwagon and got this block put together before I had to put it down for a while.  You can read more about my progress on this quilt HERE.


I hope to get back to it again later this week.  I just LOVE this quilt!!!!  There are quite a few bloggers working on this quilt right now, which makes it so much more fun! :*)

So that’s it for my September!  A lovely month, made even more lovely by the fact that my daughter came into my life in September.  I love you Christy!!!

October is always a bittersweet month for me.  I love the onset of fall with its cooler temperatures and the trees all resplendent with color and majesty!!!  But it also means winter is approaching, and that I do not like!  I've never enjoyed cold weather, coats or blustery winds – brrr!!!!!  But I know we have to have winter in order to have balance in our ecosystem, and in order for spring to come around once again, so I will choose to ENJOY this winter!  That has been my word for 2012 – ENJOY!  And for the most part, I think I've done a pretty good job of that.  What about you?  What is your favorite or least-liked season?

But today it is still just the first day of October, and I am now on my way to go and ENJOY spending the day sewing with some of my bestest quilting buddies!  I hope your October is an amazing month for you and yours :*)


Hugs & Blessings,
Teresa
=^..^=


Be sure to go over to these fun blogs to see what others have been having fun sewing up ......
Patchwork Times


NewFO2012


Monday, September 17, 2012

Fun with Dots on Dots!!!

I'm going Dotty!!!  Anyone want to go with me :*D


Today is my day to share my block !  

I had a TON of polka dotty fabrics to choose from when I started planning my block.  I actually didn't realize I had that many different dot fabrics until I started pulling them all :*)  LOL!!!


Just a sample of what I pulled !!!

I gave a hint in THIS POST about some of the fabrics I was thinking about using for the block.  And you'll be happy to know that I used almost all of those fabrics to make these CUTE little teapots :*)


I'm calling it A Spot of Tea.  How's that for a catchy title, huh???

I found this wonderful paper-pieced teapot pattern on Craftsy and HAD TO HAVE IT!!!  It is so sweet and just perfect for letting me play in lots and lots of my dotty fabrics =^..^=  (The corners are square, it is just the way I had to pin it to the frame because I didn't have time to make a hanging tube!)

And of course, four teapots are always better than one, right?!?  

Each teapot was a challenge because I fussy-cut the main motifs to fit perfectly in the centers.
It had been quite a while since I had done that, but I think they turned out pretty nice.  
Let me know if you would be interested in learning how to do that, and I'll put together a tutorial post :*)

No, I was not drinking anything alcoholic when I took this picture!!!   :*)


There's even a sweet red & white polka dot heart button in the middle!!! *swoon!*


I had fun finding cute places to photograph my new quilt ....


What did that cup say again????


Yep!  That's what I thought!!!  ***hehehehe***

I hope you have enjoyed my totally hot and spotty, polka-dotty block! =^..^= 
I really had planned to do a couple more, but time got away from me.  
You all know how that is, I'm sure :*)
If you're new to A Quilt and A Prayer, I'd like to invite you to follow along =^..^=

I'm sending much LOVE & APPRECIATION to Madame Samm at Sew We Quilt for all the fun blog hops she has been putting together for us!!!  And she has a lot more planned too, so go on over to see what she's cooking up next :*)  And a huge thanks to Corrie at Quilt Taffy who has been our cheerleader for the Dots on Dots Hop!  What a huge job, and these ladies have handled everything beautifully!

Don't forget to go give some love to these other wonderful bloggers who are also sharing their blocks today too, okay?

September 17th

Hugs & Blessings!
Teresa
=^..^=
Related Posts Plugin for WordPress, Blogger...