
Finally!
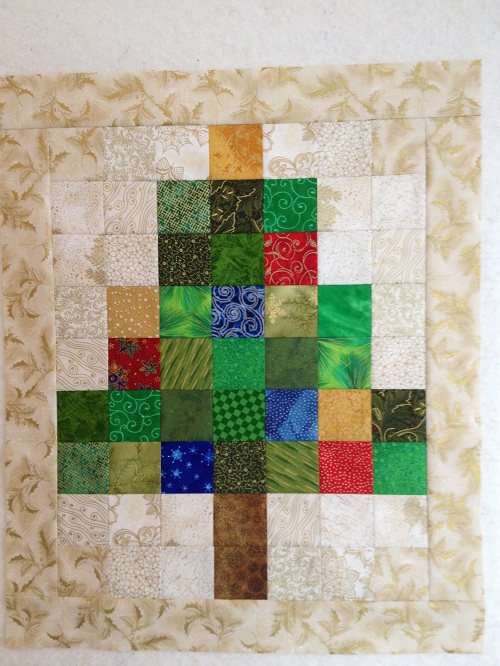
As promised, here are pictures of my finished "Twister" Tree top ..... |
| 37" by 42-1/2" |
 |
| 11-1/2" by 13-1/2" |

What a fun way to learn how to use the Twister Tool!!!

Our Guild sponsored the class which was taught by one of my most very favorite people, Miss Starr Howell. Here we are, all of us working like little bees....


Then we were able to just take the ruler to the sewing machine and sew the rows together without getting confused. Easy peasy! One note here - we had to be careful because cutting them "twisted" like this meant the edges became bias edges! But even so, they went together pretty easy and quickly.
When I sewed all of the "twisted" squares back together, I ended up with this...

How cute is that????

And this is the border fabric I finally chose to go with. You can't tell these true colors on the full quilt picture. It was a challenge to get those large elements to work, but I was happy with the result.


Of course, we only had time enough to work on our large trees in class. But for those of us who wanted to make tiny trees too, Starr gave us excellent instructions on how to be oh-so-careful to not cut too far into the surrounding fabric. She advised us to cut "close" to the ends and then use a pair of scissors to cut the final little bit.


When I was done cutting out all the large squares, I had this sweet little pile of squares left over......=^..^=

When I got around to cutting these down into 2-1/2" squares, I saw why it had been so important to take such care. In some cases, I barely shaved off some threads to get the square...


It feels heavy and dense like a quilt even before it's quilted!
I hope my adventures in Twisting have inspired you to grab the tool and begin playing with your own Twisty quilts! I will leave you with some pictures of some of the other Twister quilts Miss Starr has made which she shared with us the day of class. I really want to make these too!!!


So go out there and GET TWISTIN' !!!
Teresa
=^..^=
Very fun, Teresa! I love the tiny tree, especially! (You know me and minis!)
ReplyDeleteWhen I made my little tiny square twister quilt I pressed my seams open. Since I just did stitch-in-the-ditch quilting, that made it easier to work with.
Now I want to go make another twister quilt, but I can't right NOW!! Oh, I need to quit looking at cute little quilts. : )
I love both of your lil twister trees. I have made the pattern that came with the template and really enjoyed it. I must try a tree for Christmas. Thanks for sharing.
ReplyDeletewhat fun ideas! I have the regular ruler and the tree or wreath is a great idea!
ReplyDeleteThat does it ... you just enabled me! I WANT ONE OF THESE! LOL! I adore the tree ... and the wreath, too!! Great job! :)
ReplyDeleteOh so very sweet!! You did a VERY FINE job!!! Thanks for sharing!!!
ReplyDeleteBlessings
I really like your background. I've got the large one done and all squares sewn together for small. I also have another large one sewn together waiting to be cut apart. It is so fast and easy, but looks difficult.
ReplyDeleteIt looks great and I love the other ones too.
ReplyDeleteCute, cute, cute, Teresa. I love love love the quilts. Do they happen to make one for rectangles?
ReplyDeleteOh MY!! Those are soo cute!! Now I want to make them too. You have such good taste in patterns and colors for your quilts. Wish I was 25 again so I'd have time to make all the wonderful quilts I see on blogs. You are amazing. Have fun with your company this weekend.
ReplyDeleteLove the twisters you made. Bought a ruler in the spring and only had time to stitch one but now cwnnot wait to experiment others. Thanks for the ideas.
ReplyDeleteThank you for such a detailed post. I have a twister, but have never used it. Your post makes it seem less intimidating. ...and I love that bit of blue in your tree!
ReplyDeleteIs there a pattern for the "Flower Garden" twister quilt?
ReplyDeleteI've seen it and several other patterns at the Gathering Room Quilt Shop. Google it. You can even download the patterns.
ReplyDeleteCould you please share where I can purchase the patterns for the lovely twister quilt shown above?
ReplyDeleteVery cute twisters. Is the Santa pattern a published pattern (or can you direct me to the pattern)
ReplyDeleteHello, i would like yo budy Santa pattern a published pattern (or can you direct me to the pattern), I appreciate you answer! My mail is angelitopaz177@hotmail .com thank you very much
ReplyDeleteI would like to buy the pattern Twistter santa. Thank you
ReplyDelete