
Easy Street is finally quilted and bound
I really wanted to have this quilt finished for Bonnie Hunter's visit last week, but time ran out for me to even think about trying to do it myself. So I asked my friend Ruth to quilt it for me.
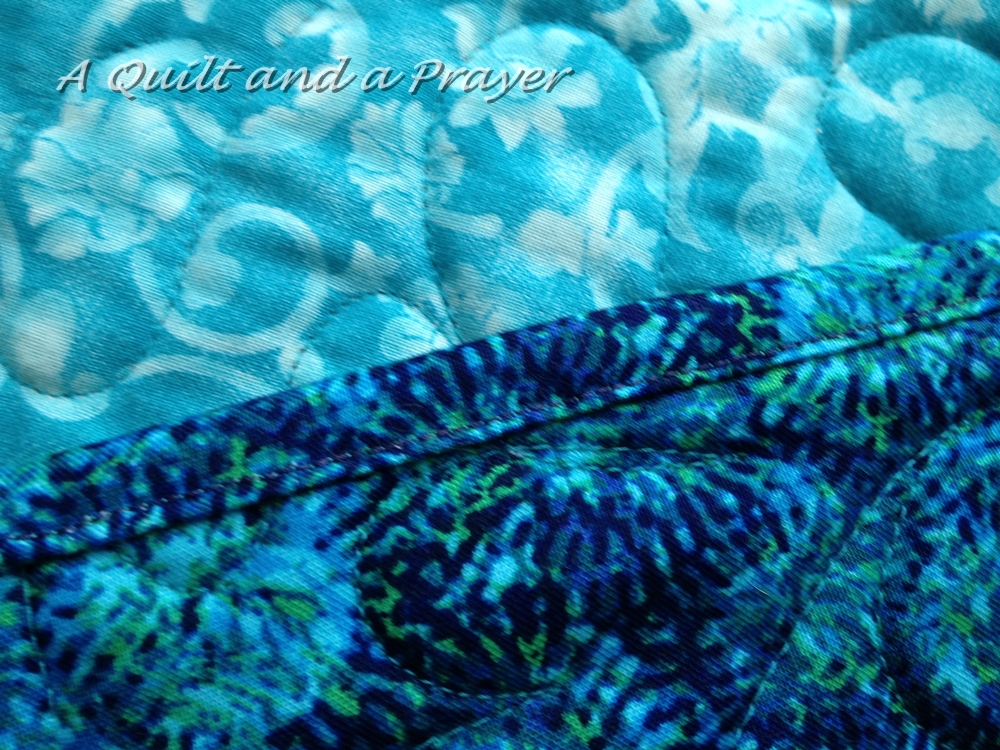
We chose this lovely feathery panto and Ruth used a gorgeous aqua thread... I just love it!!!!


I also chose to do the binding by machine - another time saver!
Plus, the binding will be more secure and sturdy.
Since this will be a guest room bed quilt, it will see lots of use and washings :*)
Sounds quick and simple, right?
WRONG!
I carefully measured the quilt to figure out the number of strips I would need. Nine was cutting it really, really close, especially with some of the strips from the leftover piece being shorter than WOF.
I calculated how wide I could make the border and still have enough left over for the binding strips.
And then I got stupid!
I didn't recheck my measurements and I didn't write them down!!!
You know the old saying....
Measure Twice, Cut Once?
Well, let me tell you, life is sure a lot easier if you listen to that saying!
And I'm adding in a for-the-future note just for me - WRITE IT DOWN!!!
=^..^=
It didn't take very long to realize that I wasn't going to have enough left for my nine binding strips at 2-1/4" wide each. I had nothing else that would work for the binding, and I really wanted that beautiful border fabric to flow out all the way to the edge!
So this is what I did....
The remaining fabric was enough to cut nine strips at 1-1/4" wide. Then I cut 1-1/2" off each of the border strips, leaving them the 4-1/2" they were supposed to be cut originally. This left me with nine strips of each width, some of them a few inches shorter than others. This is a huge quilt, and I was worried that with the strip joins and mitered corners, I might lose too much and run short. I was holding my breath the whole way!

I then zig-zagged them together, with the edges butted up next to each other, like this....
 |
| I used a dark blue thread on the actual pieces - this is just to show how I did it :*D |

I wasn't really sure if it was going to work. After stitching the first two pieces, I tugged on them to see if they would be weak or separate - nope, it was a nice strong join! Next, I trimmed the strips to a nice uniform 2-1/4" wide.
Since the strips were different widths, when I folded them in half the zig-zagged section was hidden in the fold. And it laid nice and flat for me!


Don't you just love the satisfaction of a pile of binding all prepped and ready to sew down?

But was it going to be enough?
That was the big question!!!
According to my measurements, I was going to have only inches to spare!

And voila!!!!
This is what I had left over - 9 inches!!!

It was actually more left over than I thought there would be, so Happy Dance time!!!
So that is my story about my recent Adventures in Binding.
It is a cautionary tale, and one I hope to take to heart in the future.
In the meantime, I will be enjoying my new quilt....

I wish you all...
Hugs & Blessings!
Teresa
=^..^=
Well, that was a close call... glad you were able to save yourself and get your binding done. Thanks for sharing how you sewed the strips together. I'll store that away in my memory and hope I never have to use it! Your quilt is beautiful, great job!
ReplyDeleteGreat save! I would never have thought to do that!
ReplyDeleteIt turned out to be an absolutely stunning quilt! How ingenious on your part, and I will bet not one person will say a word about it! They will simply love using it!
ReplyDeletebrilliant...and i'm sure that bonnie is proud of you!!
ReplyDeleteSuper save - sure you are not the only one to have done this in the cutting/measuring error. Just a beautiful quilt and love the panto choice as well as thread colour.
ReplyDeletegreat quilt and great save on the binding! I would never have thought of that - now I learned something new today and I'm going to file it away for a 'just in case'. Thanks for sharing
ReplyDeleteFabulous finish and it once again proves quilters are most ingenious at getting themselves into trouble and then out of it just as quickly. Great save!
ReplyDeleteWhat a great idea! It is hidden so well and worked out perfectly.
ReplyDeleteWow, way to go girl! And now you'll get to enjoy your beautiful quilt, awesome!
ReplyDeleteI love your colors of Easy Street! And quilters are creative when it comes down to mking it work! Great job! It was a night mare but worthed!
ReplyDeleteDo you know who I met today!? Guess! Bonnie Hunter! She was staying in my town and she came to visit my mother in law quilt shop! I blog about it later!
Happy sewing!
Your Easy Street is stunning. Seeing yours a few weeks back motivated me to finish my quilt top. I'm still puzzled how I'm going to longarm it, but I love the allover design on yours.
ReplyDeleteI saw on Fons & Porter Tips when you are running low on binding that you can cut the piece a little bit wider than what you need and then sew it to muslin. I'm not sure if you had wide enough pieces to do this or not, but 9" is plenty left over. LOL. Great finish!
My goodness, I would NEVER have thought of that solution. Genius, Teresa.
ReplyDeleteWhat a wonderful finish. Beautiful colors and workmanship. Lovely choice of panto and thread. Great job, girlfriend!
Good job. Your quilt is fabulous!
ReplyDeleteIt's all good in the end, I'm so glad for you to have it finished! L.O.V.E. your border and binding, I want to go with the blue green, also.
ReplyDeleteA lady came to my quilt class to show her finish to a friend, and I was so tickled to see it was an Easy Street quilt! Her name was Missy, and she and I talked like friends sharing on the challenges, etc involved in this one. She paid to have hers quilted and bound, which made me not feel too bad about not being completed yet ~
:-}pokey
Your quilt turned out so beautiful!
ReplyDeleteAnd your story about the binding - wow! I am glad that you had enough in the end.
Saskia
Lovely finish to the Easy Street. Mine is sitting on my dining room table to get marked and machine quilted still. I would love to get it finished before my parents get here to put on the guest bedroom bed.
ReplyDeleteCongrats on coming up with such a great, workable solution. And it's good to know that others run into the same Road Blocks that I do once in awhile! Thanks for sharing. :)
ReplyDeletewow, it is a beauty! and lessons learned. life is good isn't it? : )
ReplyDeleteStunning quilt Teresa! What a great binding story and save too. I've made mistakes like that too with cutting the wrong size. All's well that ends well.
ReplyDeleteWhat a brilliant save! I'm bookmarking this post for future reference.
ReplyDeleteYour quilt is gorgeous!
Whew! Glad that worked out! That was such a clever solution - bravo!
ReplyDeleteoh dear, glad you were able to make it work! It looks fantastic! Gorgeous quilt :-)
ReplyDeleteI so know that feeling of dread - when your rotary cutter has slashed through and - oops wrong measurement!!! So glad it worked out and the quilt is absolutely gorgeous!!
ReplyDeleteBlessings
Good save! I probably would have been so frustrated with myself that I wouldn't have thought of this genius idea. Easy Street looks fabulous!!!!
ReplyDeleteOh my, that sounds like something I would do. Good job on coming up with a solution to get the quilt bound. It turned out absolutely beautiful!
ReplyDeleteYou did good wiggling out of that scrape! :) Beautiful quilt!!
ReplyDeleteHoly cow! I don't know how I missed this post, but I now have 2462 emails in my inbox. Maybe that's how! lol
ReplyDeleteI love your ES and the panto your friend used on it. Name of it?? What a slick trick on the binding. I have another one I use quite frequently--a reversible where the front of the binding matches the top border and the back of the binding matches the backing. You only need 1.5" of your front fabric for this plan. I love doing it too! Yours was a good save though. Where there's a will, there's a way, right? I'm still waiting to finish piecing my backing to my ES. Maybe next year.